Azure Pipelines でテストカバレッジをいい感じに表示する
◆ はじめに
皆様、AzureDevOps使ってますか?旧 VSTS。
カンバンから、リポジトリから、CI/CDから、開発にかかわる便利なサービスが一通りそろってる印象。
今の職場では、その中でもCI/CDサービスであるAzure Pipelinesを活用して開発を行っている。
で、この度そのAzure Pipelines上でテストカバレッジを計測、表示したくなったのでやってみた、という記事。
◆ お手軽版
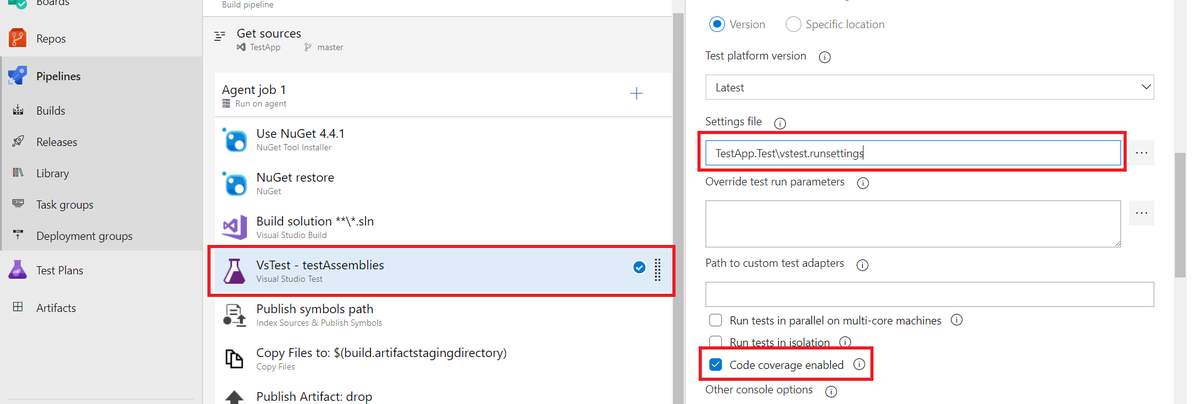
最も簡単な方法は、Pipeline のタスクの1つである「Visual Studio Test」を使って実現する方法。
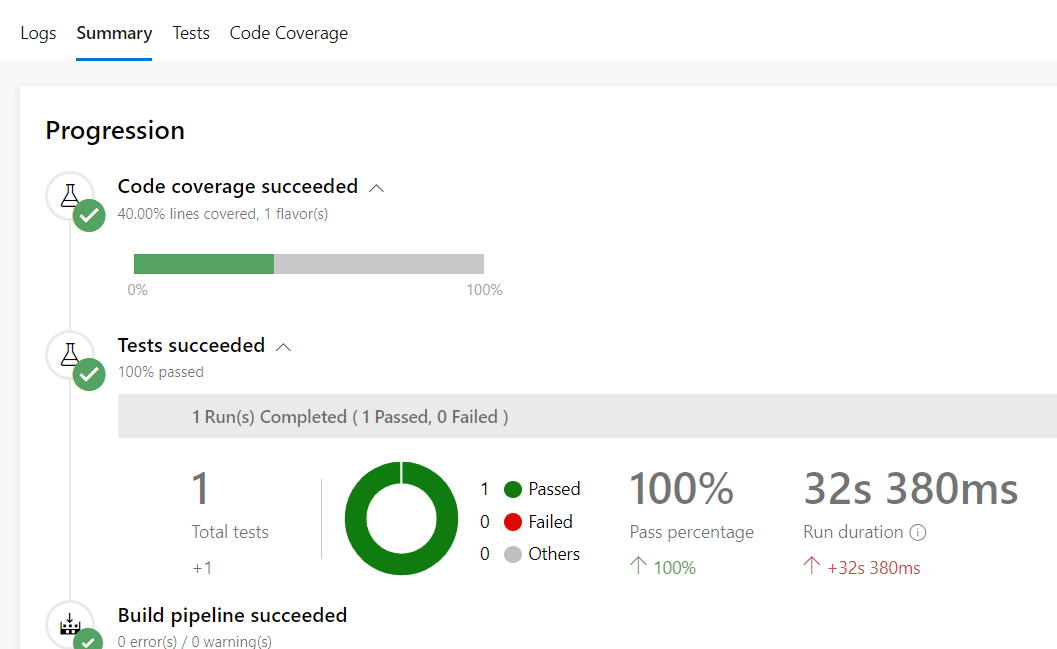
タスク内設定の「Code coverage enabled」にチェックをつけるとそれだけで、Pipeline 実行後の Summury 上にカバレッジが表示される。
ただし、外部ライブラリ等を入れている場合は、それを含めたカバレッジになってしまうので、
カバレッジ測定の範囲を指定したrunsettingsファイルを作成してあげる必要がある。
フォルダ構成
- TestApp
- TestApp.Test
    - vstest.runsettings
vstest.runsettings
<?xml version="1.0" encoding="utf-8"?>
<RunSettings>
  <!-- Configurations for data collectors -->
  <DataCollectionRunSettings>
    <DataCollectors>
      <DataCollector friendlyName="Code Coverage" uri="datacollector://Microsoft/CodeCoverage/2.0" assemblyQualifiedName="Microsoft.VisualStudio.Coverage.DynamicCoverageDataCollector, Microsoft.VisualStudio.TraceCollector, Version=11.0.0.0, Culture=neutral, PublicKeyToken=b03f5f7f11d50a3a">
        <Configuration>
          <CodeCoverage>
            <ModulePaths>
              <Include>
                <ModulePath>.*TestApp.*</ModulePath>
              </Include>
              <Exclude>
                <ModulePath>.*TestApp.Test*</ModulePath>
              </Exclude>
            </ModulePaths>
            <!-- We recommend you do not change the following values: -->
            <UseVerifiableInstrumentation>True</UseVerifiableInstrumentation>
            <AllowLowIntegrityProcesses>True</AllowLowIntegrityProcesses>
            <CollectFromChildProcesses>True</CollectFromChildProcesses>
            <CollectAspDotNet>False</CollectAspDotNet>
          </CodeCoverage>
        </Configuration>
      </DataCollector>
    </DataCollectors>
  </DataCollectionRunSettings>
</RunSettings>
設定例
結果
ちなみに、この方法は、TFUGのSlackで
@kkamegawaさん、@changeworldさん
からきいた。
聞いてみればなんてことないが、個人的には「うおーわからんぞー」とか言いながらあれやこれやしてたので、目からうろこで感動した。
素晴らしい。自分も貢献していきたい。slackに参加したい方は以下ブログに記載があるのでどうぞ。
https://tfsug.hatenablog.jp/entry/2019/01/19/222017
◆ OpenCover + ReportGenerator 版
↑のやり方は非常に簡単で良いのだが、カバレッジ結果の詳細表示ができない。
なので、OpenCover + ReportGenerator を使っていい感じに表示させる。
1) テストプロジェクトに OpenCover を Nuget で追加
OpenCover はコードカバレッジツール。
リポジトリに追加したら、Pipeline へ連携しているリポジトリへの push を忘れずに。
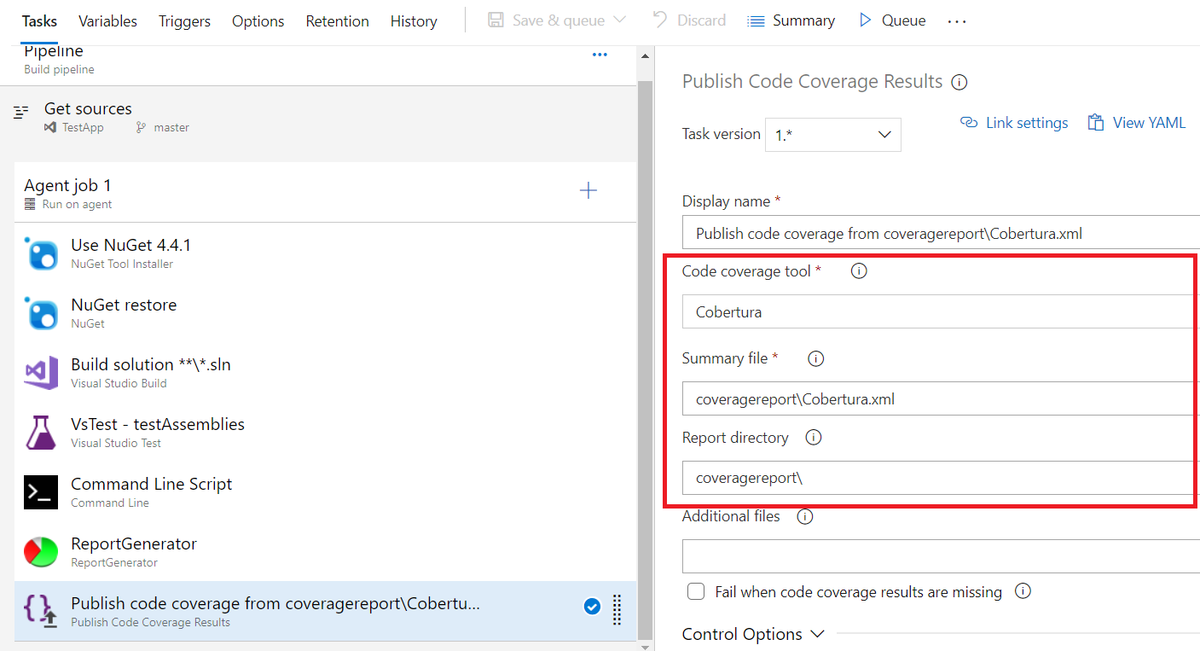
2) Azure Pipelines で以下のようなタスクを設定
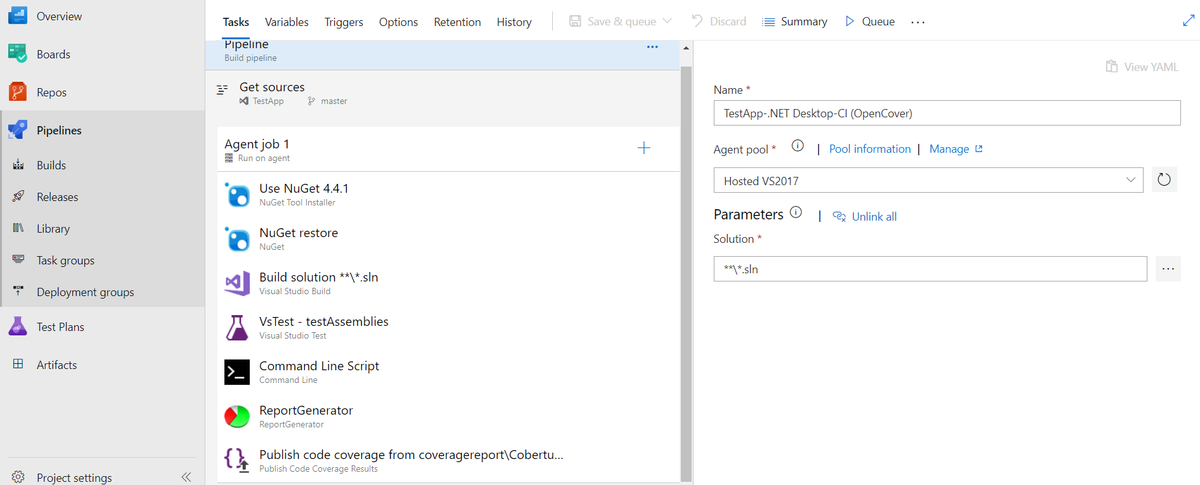
また、ビルド設定を「Debug」にする。

以下、タスクの詳細設定。
2-1) Visual Studio Test タスク
今回は「Code coverage enabled」のチェックはつけない。
2-2) Command Line タスク
テストプロジェクトへ入れたOpenCoverをコマンドラインで実行し、カバレッジ結果を出力する。
Script
%OPEN_COVER% -register:user -target:%MSTEST% -targetargs:%TEST_DLL_FILE% -targetdir:%TEST_DLL_DIR% -filter:%FILTER% -output:%OUTPUT_FILE%Environment Variables
| Name | Value |
|---|---|
| MSTEST | “C:\Program Files (x86)\Microsoft Visual Studio\2017\Enterprise\Common7\IDE\CommonExtensions\Microsoft\TestWindow\vstest.console.exe” |
| TEST_DLL_DIR | “TestApp.Test\bin\Debug” |
| TEST_DLL_FILE | “TestApp.Test.dll” |
| FILTER | ”+[TestApp] -[TestApp.Test]“ |
| OUTPUT_FILE | “coverage.xml” |
| OPEN_COVER | ”.\packages\OpenCover.4.7.922\tools\OpenCover.Console.exe” |
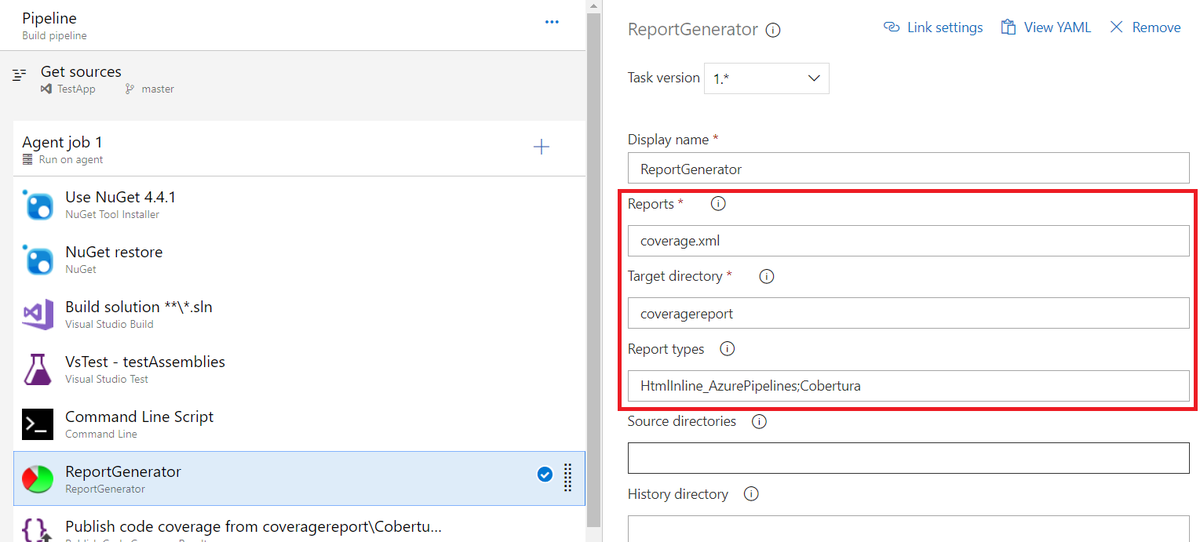
2-3) ReportGenerator タスク
「ReportGenerator」タスクはマーケットプレースから追加する必要がある。
2-2) で出力したカバレッジ結果の xml を読み込み、カバレッジレポートを出力する。
2-4) Publish Code Coverage Results タスク
2-3) で出力したカバレッジレポートを読み込む。
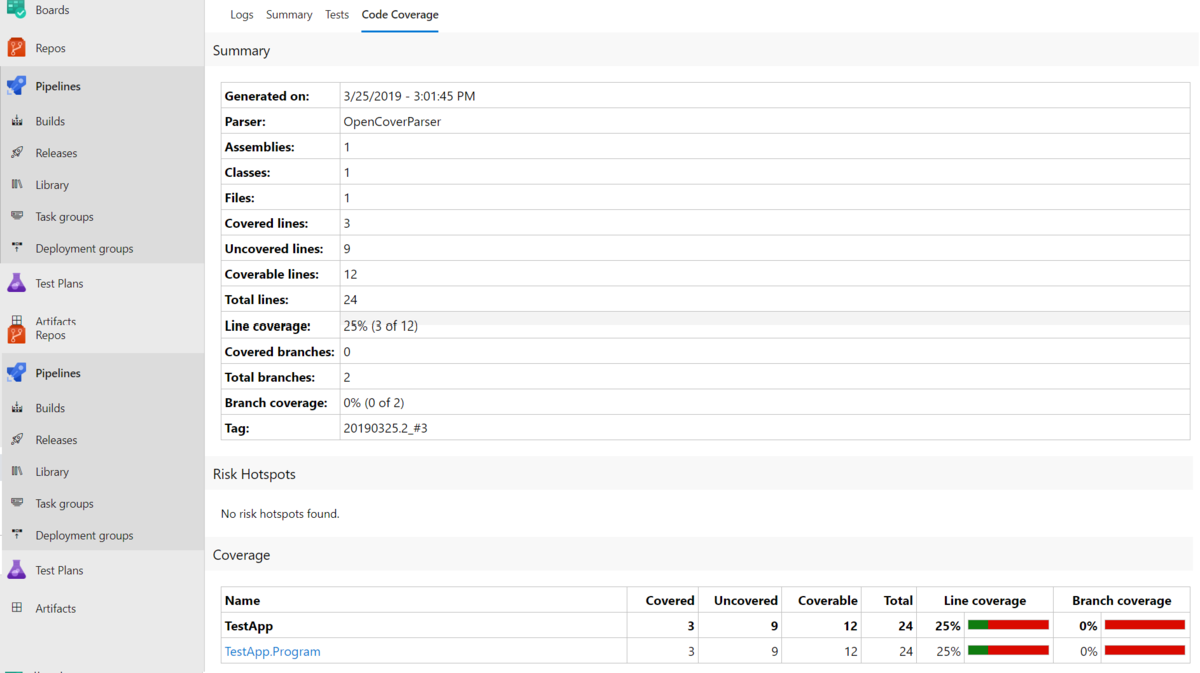
3) いい感じの結果
Good.
◆ まとめ
Azure Pipelines でコードカバレッジのお手軽表示から、OpenCover + ReportGenerator を用いていい感じの表示方法について書いた。
ちなみに、今回の例は .NET Frameworkです。.NET Core ならもう少し簡単に表示できるっぽい。TsuyoshiUshioさんの素晴らしい記事がある。
…時代はやはり .NET Core だな。